Section 7: Activating your Name Servers
Step 1: Registering your Name Servers
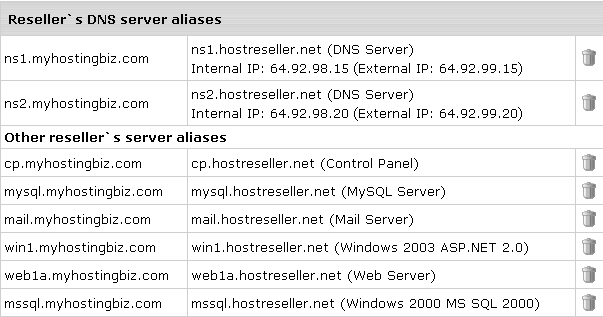
In Section 3 - Step 3 you created your server aliases. We now want to use those IP addresses to register your name servers with your domain registrar. To find the aliases again, please login to your administrative control panel (if you aren't there all ready). Click the "E.Manager" button on the top navigation bar and choose "Server Aliases". You should see the following screen:
In order for your name servers to work, you must create them with the Domain Registrar which you have registered your dns zone domain with (ex. myhostingbiz.com). Most domain registrars provide some method to allow you to create/register your own name servers with them. Please contact your registrar or read their help guides to find out how.
In the case above (if myhostingbiz.com was your DNS zone name), you would have to create all the listed name servers for myhostingbiz.com at your domain registrar, pointing each to their corresponding External IP's.
Example (your IP's may vary, always make sure to use the IP addresses shown under "Server Aliases" in your control panel).
ns1.myhostingbiz.com - 64.92.99.15
ns2.myhostingbiz.com - 64.92.99.20
Once you have created the name servers at your domain registrar you now need to point your dns zone domain to your own name servers. In this case we would point myhostingbiz.com (our example dns zone domain) to ns1.myhostingbiz.com and ns2.myhostingbiz.com. NOTE: It can take up to 72 hours for the DNS changes to begin working.
Step 2: Verifying your DNS Changes
Once you have waited 48-72 hours for your DNS zone to propagate, you'll need to verify that the dns zone domain is resolving to the proper IP addresses. If your domain name were myhostingbiz.com, try pinging cp.myhostingbiz.com to see if your DNS zone has propagated correctly. If you have not yet waited 48-72 hours, please skip this step and return once you have waited 48-72 hours.
If you are running a Windows based operating system you can run a ping test by following these steps:
Click your Windows "Start" button and choose "Run". You should see the following screen:
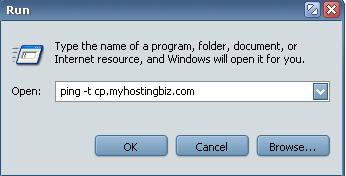
If there is something in the box all ready, remove it and type: ping -t cp.myhostingbiz.com (substitute your domain for myhostingbiz.com) then click "OK". If your DNS is functioning properly you should see a screen like the following:
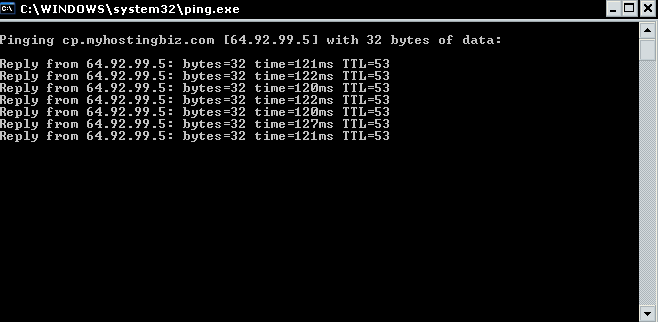
If the DNS is not functioning properly the black screen will simply disappear, or you might see a message saying "Host cannot be found". If it has been 48-72 hours since you made your DNS changes as outlined in Step 1 and you do not get any response when pinging your dns zone domain, please contact our support department. You should also make sure that the IP address returned matches the IP address listed under "Server Aliases" for the particular host name your are testing.
You can also use the above method to test your other server aliases. For example, you could try pinging ns1.myhostingbiz.com, mail.myhostingbiz.com, or any other server aliases that you see in your control panel. Each one should reply back with an IP address that matches what you see in your control panel. If any fail to work, and it has been 48-72 hours since you updated your DNS configuration please contact our support department.
Step 3: Changing your Control Panel URL (Click here to view Flash Video)
If you have successfully verified that cp.myhostingbiz.com (where myhostingbiz.com is replaced with your dns zone domain) is returning the proper IP address than you will want to change your temporary control panel URL to it's permanent location. I.e. so you and your customers can access your control panel by going to http://cp.myhostingbiz.com (where myhostingbiz.com is replaced with your dns zone domain).
To change your Control Panel URL you first need to login to the Top Level of your control panel. You can do this by following the instructions you received in the welcome letter (like we did in Section 1). Click "Info" on the top navigation bar and choose "Change URL". You should see the following screen:

Remove what is in the middle box (in this case it's r41.res.hostreseller.net) and type in cp.myhostingbiz.com (replacing myhostingbiz.com with your dns zone domain) and click the "Change" button. It should look something like the following:

You should now be able to access the control panel by going to http://cp.myhostingbiz.com in your browser.
Step 4: Finishing Up
Congratulations! You now have enough working knowledge of the H-Sphere reseller system to begin running your hosting business. The information provided in this guide was the basic requirements of what you needed to begin using your account. We strongly recommend that you read over our Reseller Documentation to learn more about other features, and advanced options that your account offers.
We wish you the best of luck with your new venture!
Sincerely,
The Host Reseller Support Team
|