Section 4: Setting up your Service Account
Step 1: Creating your Service Account Plan (Click here to view Flash Video)
In order to host web sites within your reseller account, first you have to create a hosting plan, and second you must signup an account under this plan.
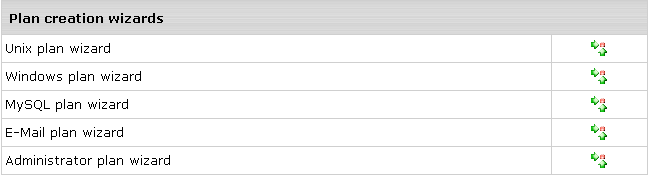
Click "Info" on the top navigation bar and choose "Plan creation wizards". You should see a screen like the following:
Choose a Windows or Unix plan to host your own company site by clicking the  to the right of either "Unix plan wizard" or "Windows plan wizard". For this demonstration, we will be creating a Unix plan. Please note, most of these options can be checked/unchecked at your discretion, below is only our recommendations. The main goal here is to create a service plan, which means that you need to check the "Service Domain" option and set the billing type to "Without Billing". to the right of either "Unix plan wizard" or "Windows plan wizard". For this demonstration, we will be creating a Unix plan. Please note, most of these options can be checked/unchecked at your discretion, below is only our recommendations. The main goal here is to create a service plan, which means that you need to check the "Service Domain" option and set the billing type to "Without Billing".
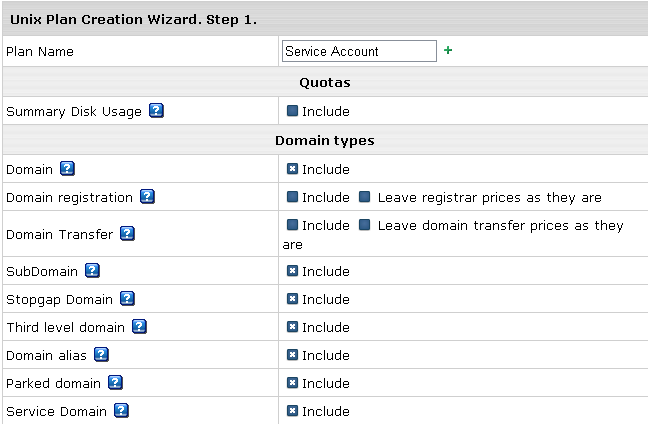
Plan Name: In this case we are creating a service plan, so you will want to name it "Service Account" or something similar.
Summary Disk Usage: We will go over this option in greater detail later. For now, you should leave this option unchecked.
Domain: Check this box to allow domain transfer and domain registration from the your End User control panel. This box should be checked.
Domain registration: Allows you to create new standard domains through Open SRS and Venom. Both boxes should be unchecked.
Domain Transfer: Allows you to transfer domains from your End User control panel. Both boxes should be unchecked.
Sub Domain: Allows you to create subdomains. Subdomains have the same functionality as regular domains. This box should be checked.
Stopgap Domain: Allows you to use hosting services without a real domain. Stopgap domains don't have DNS zones, and don't allow e-mail service. Still, you can access the sites using an instant domain aliases. This box should be checked.
Stopgap domain: Support web site management and FTP services. Also, IP-only access is possible with a dedicated IP. This box should be checked
Third level domain: Allows you to create third level domains based on the domain names you offer. E.g. if your domain name is example.com, you can have a domain like thirdlevel.example.com Third level domains have the same functionality as second level domains, i.e. regular domains. This box should be checked.
Domain alias: An extra domain name that points to a 'primary' domain. For example, the owner of the domain name example.com can register another domain name, e.g. example.net and have it point to the location of example.com. This means that every Internet user who goes to example.net will land in example.com. A domain alias can have its own DNS zone, custom DNS records and it's own mail service. This box should be checked.
Parked domain: Allows you to use our DNS servers for designating IP's to domain names serviced and hosted on other servers. This box should be checked
Service Domain: Should be included only for the administrative plans (like System plan) to host and manage your corporate web-site. Since we are adding a service plan this box should be checked.
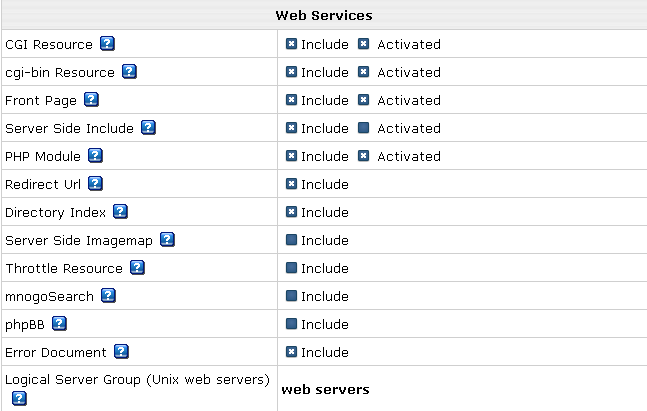
CGI Resource: Allows you to map file extensions as CGI executables. Both boxes should be checked.
cgi-bin Resource: Allows you to create a cgi-bin directory, so all the cgi-bin directory's content is treated as cgi executables which the server tries to run. Both boxes should be checked.
Front Page: Allows you to use FrontPage extensions on your web sites. The first box should be checked.
Server Side Include: Allows you to use interactive real-time features such as echoing current time, conditional execution based on logical comparisons, querying or updating a database, sending an e-mail etc., with no programming or CGI scripts.
PHP Module: Allows you to create dynamic web pages with PHP. Both boxes should be checked.
Redirect URL: Allows you to redirect visitors from one URL to another. When an Internet user tries to connect to a URL that is redirected, they are taken to the address this URL is mapped to. This box should be checked.
Directory Index: Allows you to setup custom directory indexes. This box should be checked.
Server Side Imagemap: Allows you to have files with a specific extension regarded as map files.
Throttle Resource: Allows you to throttle the use of traffic in your accounts by delaying or refusing requests to your sites. This box should be unchecked
mnogoSearch: Allows you to use H-Sphere integrated search engine that searches your sites by keywords.
phpBB: Allows you to use phpBB, H-Sphere integrated, high powered, fully scalable, and highly customizable bulletin board package.
Error document: Allows you to configure your own error pages that are shown when the requested pages fail to open.
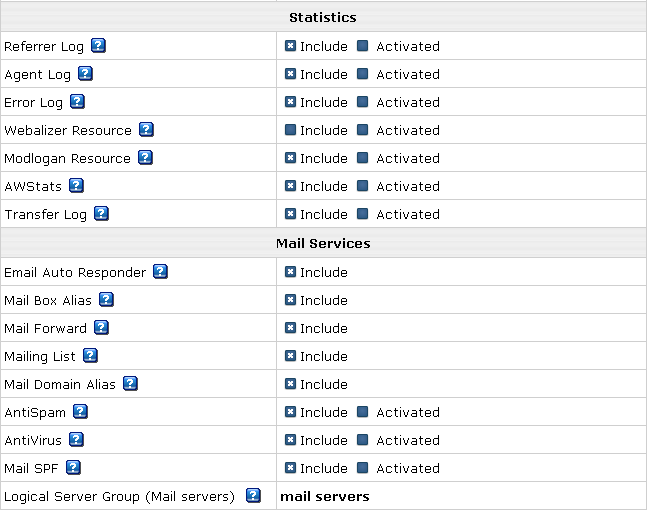
Referrer Log: Allows you to have separate referrer logs written into your directories. Referrer logs contain the URL's from which visitors were referred to your site.
Agent Log: Allows you to have separate agent logs written into your directories. Agent logs contain data about visitors, browsers or any other Internet-based software, and related data.
Error Log: Allows you to have separate error logs written into your directories. Error logs store data about errors generated by the server (e.g. Page Not Found error) or by their cgi scripts.
Webalizer Resource and Modlogan Resource: Allows you to install Webalizer and Modlogan. These freeware tools parse the transfer log and produce statistics reports in readable HTML format to be viewed through a browser.
AWStats: Allows you to install Awstats, a tool that generates advanced graphical web server statistics reports.
Transfer Log: Allows you to have transfer logs written into your directories. Transfer logs include combined data about every visit to your site.
Email Auto Responder: Allows you to automatically reply to senders with a uniform response when mail arrives in a mailbox.
Mail Box Alias: Allows you to have an alternative address routed to an existing mailbox.
Mail Forward: Allows you to automatically forward all incoming mail to remote addresses.
Mailing List: Allows you to send mail to multiple recipients.
Mail Domain Alias: Allows you to have an alternative domain name point to your primary mail domain.
AntiSpam: Allows you to setup spam filtering for your mailboxes.
AntiVirus: Allows you to setup virus filtering for your mailboxes.
Mail SPF: Allows you to create SPF's (Sender Policy Framework) which are used to preventing sender forgery in SMTP transaction, thus allowing you control over who may send mail from your domain.
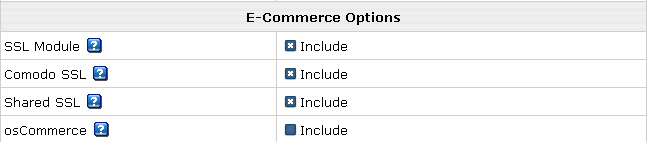
SSL Module: Allows you to use SSL, a standard for transmitting confidential data such as credit card numbers over the Internet.
Comodo SSL: Allows you to purchase SSL certificates directly from Comodo through your control panel.
Shared SSL: Allows you to use Shared SSL, which secures your third-level domains without the need to issue unique digital certificates to each hosted customer. You need to purchase and install a wildcard SSL certificate to use this option.
osCommerce: Allows you to install osCommerce, an open source e-commerce shopping cart program.
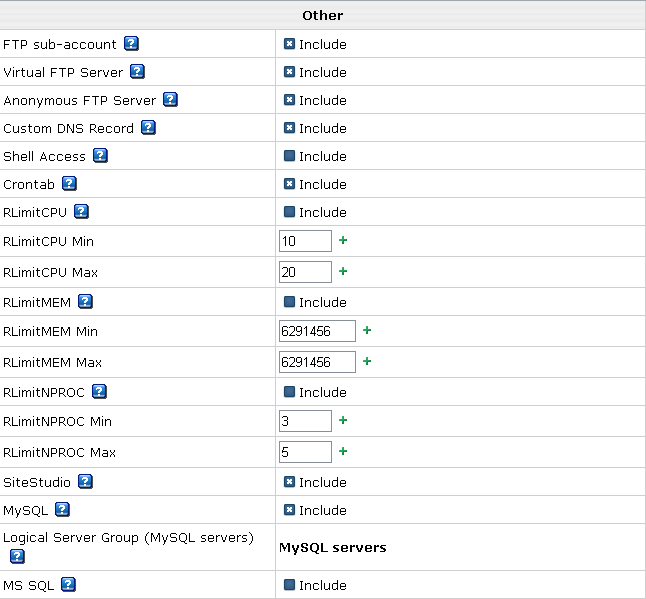
FTP sub-account: Allows you to create additional logins and passwords to your directory so others can independently use it.
Virtual FTP Server: Allows you to let others upload or view files in the dedicated directories.
Anonymous FTP Server: Allows you to let anybody else download, upload or view files in the dedicated directories.
Custom DNS Record: Allow you to create your own custom DNS records.
Shell Access: Allow you to access and operate your accounts through Shell. This should be unchecked.
Crontab: Allows you to run your own Unix shell scripts automatically.
RLimits: Allows you to limit server resources. All of the Rlimits options should be unchecked.
Site Studio: Allow you to use a powerful site construction tool enabling you to create a professional-looking site in a matter of minutes.
MySQL & MSSQL: Allows you to create and use databases.
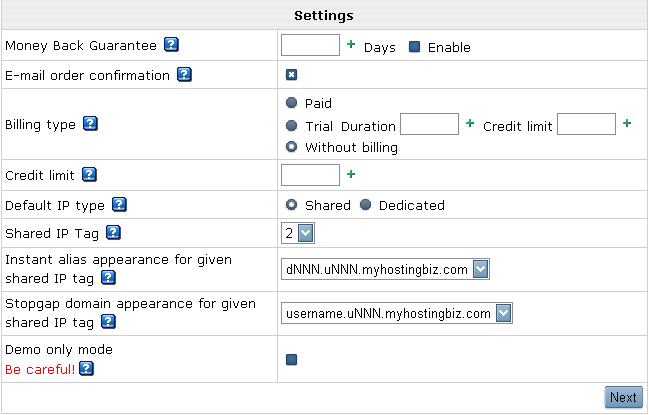
Billing Type: Since we are setting up the service account to host your own domain, we want to set the billing type to "Without Billing". Everything else can stay the same.
Once you are finished, click the "Next" button. You will see the following screen:
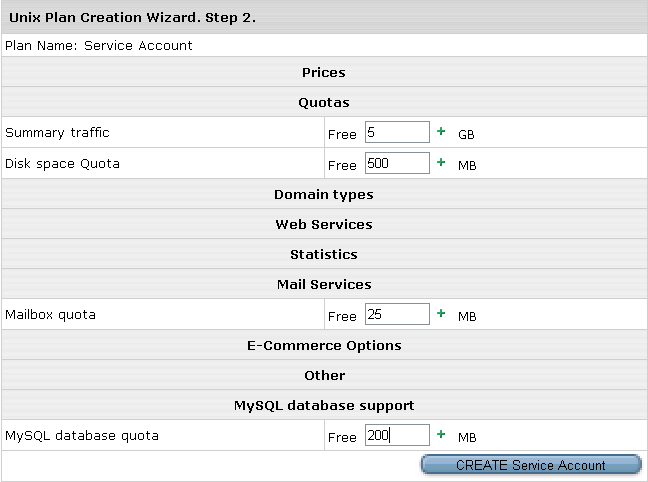
Summary Traffic: Set the total amount of transfer traffic you want to allow for your account.
Disk Space Quota: Set the total amount of disk space you want to allow for your account.
Mailbox Quota: Set the total amount of disk space each mailbox under your account can use.
MySQL Database Quota: Set the total amount of disk space each database under your account can use.
You can specify your own values here, the above is just an example. When finished, click "CREATE Service Account".
Step 2: Signing up to your Service Account
After finishing the plan setup wizard you should be taken to the following screen:
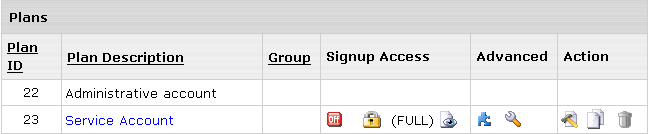
From here, turn on "Signup Access" for your newly created Service Plan by clicking the  icon under "Signup Access". If you have done this successfully, your screen should look like this (notice the OFF button turned to a green ON button): icon under "Signup Access". If you have done this successfully, your screen should look like this (notice the OFF button turned to a green ON button):
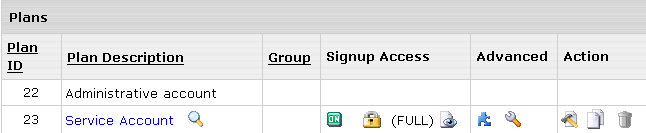
Now click the  icon to the right of your service account to signup to your newly created Service Plan. icon to the right of your service account to signup to your newly created Service Plan.
A new screen will popup with general information about the plan. Click the  button (bottom right) to continue. Accept the terms of service then click the button to continue. Fill in your contact information then click the button to continue. button (bottom right) to continue. Accept the terms of service then click the button to continue. Fill in your contact information then click the button to continue.
You should now be asked to enter a username and password for your account. Enter the required information then click the button to continue. Note: your password must be different than your username. You also need to use a unique username, do not use the same username as your administrative account.
You should now see the following screen:
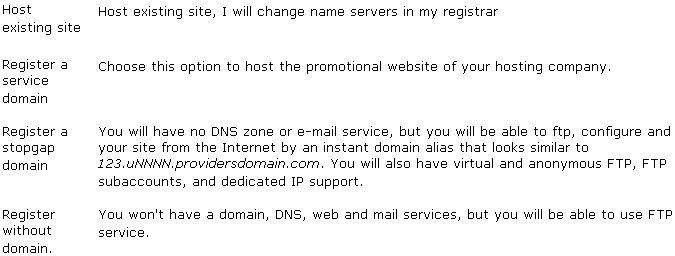
Choose the "Register a service domain" option then click the button to continue. If you do not see the "Register a service domain" option than you did not check "Service Domain" when creating the plan in Step 1. You will need to go back and edit the plan to include this option and begin Step 2 over again.
The next screen should ask you to choose the domain name you want to use for your service account. Select your domain from the drop-down list then click the button to continue. This will bring you to a final review screen, click the button to finish the service account setup.
You have successfully created your service account and are now able to host your company web site under it. Your Administrative account page may refresh into the control panel of this new account. If it does, press the back button, or re-login to return to the Administrative control panel.
You should now turn off signup access to your service plan. Please click "Info" on the top navigation bar and choose "Plans". You should see the following screen:
From here, turn off "Signup Access" for your newly created service plan plan by clicking the  icon. If you have done this successfully, your screen should look like this: icon. If you have done this successfully, your screen should look like this:
|