|
In this document we describe features specific to dedicated server plans. If any additional
info on plans in H-Sphere is needed, please refer to Plans section of the
Administrative Guide. Note that in our case there is only 1 month billing period in plan.
After a plan has been created, don't forget to enable signup access for it using the On/Off icon on the
Plans page.
User Plans
To create a dedicated server plan:
- Launch plan edit wizard using Info -> Plan creation wizards menu and choose Dedicated Server
Plan Wizard.
- On the first step of the wizard, include the necessary resources:

Backup resource provides users with a possibility to request regular backups for their
dedicated servers.
( in H-Sphere 2.5.1) DNS PTR-records resource allows users to create
reverse DNS records for IPs used on thier servers.
Choose Bandwidth Billing Type.
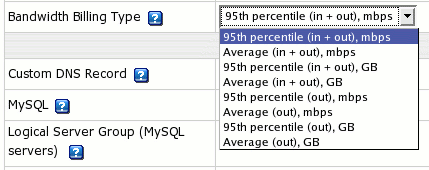
Note: Think twice choosing the type as you won't be able to change it later, when there are customers under
this plan.
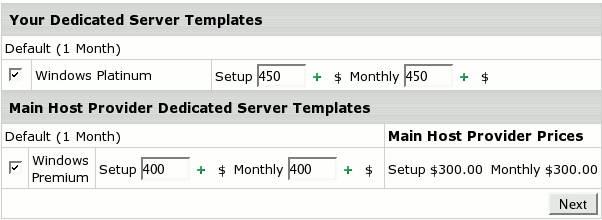
- Choose dedicated servers templates to be available in the plan - your own and your provider's, and
define their prices:
- On the step 2 of the wizard, define fees for dedicated server related resources, and set free units:

Dedicated Server IP Range: set number of IPs to acquire for free, and monthly fee per one IP.
Backup: set fees for clients' regular backups. Set monthly fee
per a planned backup task and extra fee per a custom one.
Set quotas:

Summary traffic: traffic to/from client server(s) via provider's mail system.
DS Bandwidth: all incoming/outgoing traffic for client server(s) excluding the above summary traffic.
- Step 3 of the wizard is the same as for regular plans.
User's Choosing a Server at Signup
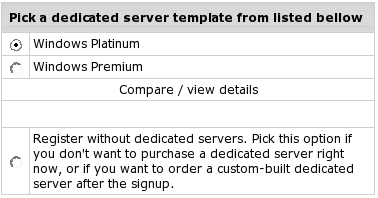
When user signs up to a dedicated server plan, he can pick up one dedicated server from templates
which you enabled in the plan:
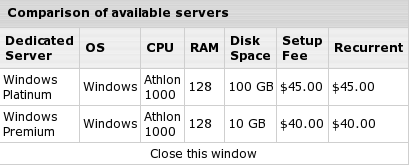
By clicking compare / view details, user can compare parameters of available servers as well
as their prices:
When user who chose a dedicated server at signup first enters his account, he finds that server in his cp and
can use it. After the signup, you can notice this server status automatically changed from Available to
In use.
Also user can choose to sign up without a dedicated server. In his cp, he can always add a templated server
or send a request for a custom-built server. In this case you can create a non-templated server and assign it to the
user's account by changing the server status to In use.
|